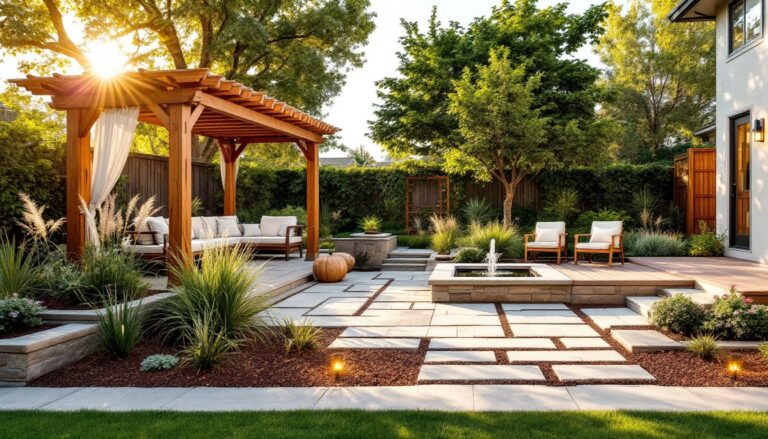
A backyard fire pit transforms your outdoor space into a gathering hub, somewhere to roast marshmallows, share stories, and extend summer evenings into fall. Whether you’ve got a sprawling yard or a modest patio, building a DIY backyard fire pit is achievable without hiring contractors. The good news: most designs use simple materials like stone, metal rings, or brick that won’t expensive or require advanced carpentry skills. From sunken designs that create cozy conversation pits to elevated brick structures that double as focal points, there’s a fire pit idea for every property. This guide walks you through five proven designs, what materials you’ll need, and how to build them safely.
Table of Contents
ToggleKey Takeaways
- DIY backyard fire pit ideas range from simple metal rings to elaborate brick structures, all achievable without contractors using affordable materials like stone, brick, and steel.
- Sunken fire pits create intimate gathering spaces with natural wind barriers but require proper drainage planning in high-water areas to prevent standing water.
- Metal ring fire pits offer the quickest setup and portability, requiring only a level spot with 10–15 feet of clearance and minimal maintenance beyond annual oiling for steel rings.
- Stone circle fire pits provide a middle-ground option that’s more permanent than metal rings while remaining less labor-intensive than sunken designs and benefit from heat-retaining properties.
- Always verify local fire codes and setback distances (typically 10–15 feet from structures) before building, as permits and restrictions vary by jurisdiction and affect which fire pit design suits your yard.
- Essential safety practices include keeping a water source nearby, never leaving an active fire unattended, maintaining proper clearance from flammables, and removing ash regularly to prevent rust and mortar degradation.
Sunken Fire Pit Design
A sunken fire pit sits below ground level, creating a natural wind barrier and intimate seating arrangement. The concept is simple: dig a shallow pit, ring it with stone or pavers, and let gravity and excavation do most of the work.
Materials needed: Landscape fabric, gravel or sand base, exterior-grade pavers or stacked stone (4–6 inches tall), soil, and a metal grate or grill insert (optional but useful). If you’re in a high-water-table area, drainage becomes critical, standing water will turn your pit into a bog.
Digging and prep: Mark out a circular area roughly 3–4 feet in diameter using a rope or chalk. Dig down 12–18 inches, depending on your soil type and preferences. Remove roots and rocks as you go. Compact the bottom with a hand tamper, then add 2–3 inches of gravel for drainage. Lay landscape fabric over the gravel to prevent soil migration.
Building the ring: Stack pavers or stone blocks around the perimeter. Sunken pits don’t usually need mortar if you’re using interlocking pavers or carefully fitted stone. Check your local fire codes, some jurisdictions require a metal ring or permanent structure even for ground-level pits. A circular metal fire ring (18–24 inches diameter) inserted into the pit gives you a defined burn zone and makes cleanup easier.
Finishing touches: Backfill around the outside edge with soil, pack it firm, and plant grass or low ground cover. The sunken design works especially well for small backyards and encourages seating close to the fire without having people stand around the perimeter like they’re guarding it. One honest note: if your area gets heavy rain, even with gravel drainage, you might need to bail water occasionally. It’s a minor inconvenience for a genuinely cozy gathering spot.
Metal Ring Fire Pit
The metal ring fire pit is the minimalist’s choice, just a steel or cast-iron ring anchoring your fire, no digging required. It’s portable, quick to set up, and works on hard-packed soil, gravel, or patio surfaces.
What you need: A metal fire ring (typically 24–36 inches in diameter), a metal grate or spark screen (optional), and a level spot with at least 10–15 feet of clearance from structures, trees, and vegetation. Steel rings are cheaper and lighter: cast iron holds heat longer but weighs more and can rust without proper maintenance. Corten steel (weathering steel) looks refined and develops a rusty patina that’s intentional and attractive, it stabilizes over time and doesn’t continue rusting away.
Installation: Place the ring on level ground. If you’re on grass or uneven soil, dig out any high spots and pack the base firm. Lay a metal grate inside if you want to elevate logs and improve airflow. That’s honestly it. No footings, no mortar, no permits in most residential areas (check locally to be sure).
Pros and cons: Setup takes minutes, and you can relocate it if you rearrange the yard. Cleanup is straightforward, just remove ash and charred wood. The downside: metal rings conduct heat, so kids and pets need supervision, and the open design lets wind affect the fire. They also don’t provide much seating structure, so you’ll need outdoor chairs or benches nearby.
Maintenance: Steel rings benefit from a wire brush and oil treatment annually. Corten steel requires minimal maintenance beyond occasional rinsing. Keep ash cleaned out between uses: it holds moisture and accelerates corrosion on the interior surfaces.
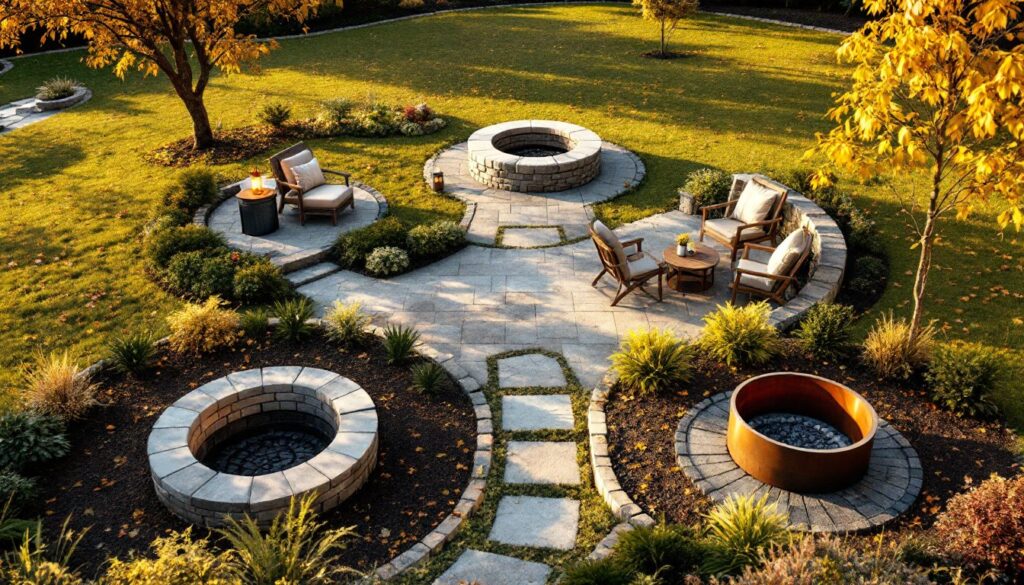
Stone Circle Fire Pit
A stone circle is the Goldilocks option, more permanent than a metal ring, less labor-intensive than a sunken pit. You’re stacking natural stone or landscape blocks to create a containment structure without mortar (dry-stacking) or with mortar for extra stability.
Materials and planning: Gather fieldstone, limestone blocks, or concrete pavers. Aim for stones roughly 12–18 inches wide and 6–8 inches tall so you can stack two or three high. You’ll also need landscape fabric and gravel for the interior base. Calculate your diameter first, a 4-foot circle holds a comfortable fire and lets three or four people sit close. Mark the perimeter with spray paint or chalk.
Base preparation: Remove sod and soil down 3–4 inches. Tamp the base firm, then lay landscape fabric and 2 inches of gravel. This prevents weeds and improves drainage inside the ring.
Stacking the stones: Arrange your first course of stones around the perimeter, fitting them snugly. If stones are irregular, you may need to tap them with a rubber mallet to settle them. Place your second course on top, staggering joints like brickwork for stability. Dry-stacking works fine if your stones fit reasonably well: you don’t need mortar for a casual fire pit. If you want it more permanent and weatherproof, you can apply mortar-jointing methods, using exterior-grade mortar and weather-resistant sealers.
Finishing: Add a metal grate inside for proper airflow, or just burn directly on the gravel base if you prefer. The stone will radiate heat outward, so seating stays comfortable. A key advantage: the stone mass helps retain heat, which means you’ll get coals that burn longer and more steadily than with a metal ring alone.
Portable Fire Pit Table
A fire pit table marries function and style. It’s a low table or platform with a burner insert, giving you a place to rest drinks and snacks while you gather around the flames. These range from rustic wood-frame designs to sleek metal tables with built-in fire boxes.
DIY approach: You can build a simple one using pressure-treated lumber (2×6 or 2×8 boards), a metal frame, and a steel tabletop or steel grate. Cut four legs and a rectangular frame, then attach a commercial fire table insert (a stainless-steel or cast-iron burner pan, roughly 20–24 inches square). These inserts hold propane or natural gas, controlled by a valve and ignition switch. Cost varies, basic propane inserts run $150–$400.
Assembly basics: Assemble the wooden frame using galvanized bolts or lag screws (stainless steel if you want longevity). Treat all wood with exterior sealant or paint to protect against weather. Mount the fire insert in the center, ensuring it’s level and secured properly. Run a propane line from a tank below the table or to the side, with shut-off valves and safety connectors rated for outdoor use.
Advantages and limitations: Propane fire pits ignite instantly, produce no smoke, and are easy to control. You won’t have the primal experience of tending a wood fire, but you’ll have a cleaner gathering spot. Propane also works on patios where wood fires aren’t permitted due to building codes. The downside: you’ll need regular propane refills, and the table becomes a more permanent fixture that’s harder to relocate than a simple metal ring. Always keep the fire table away from overhanging branches and use proper fire pit safety precautions when operating propane equipment.
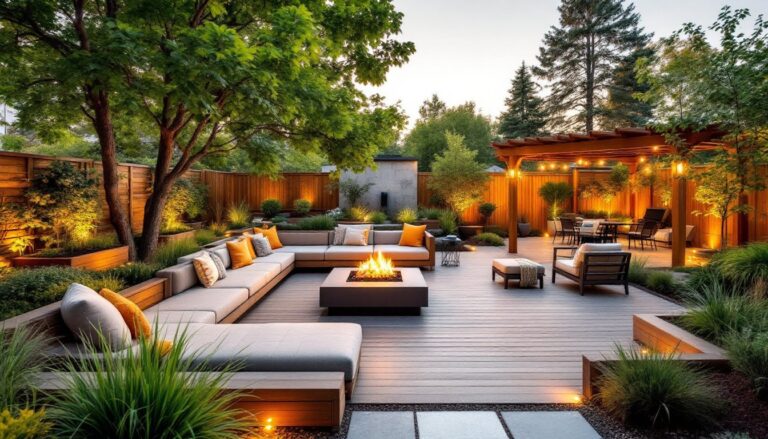
Elevated Brick Fire Pit
An elevated brick fire pit sits 12–24 inches above grade, creating a raised structure that doubles as informal seating and looks polished in the landscape. It’s more involved than a simple ring but creates a striking focal point and integrates nicely into a designed outdoor space.
Construction Steps
-
Plan and mark: Lay out your pit area (ideally 3–4 feet in diameter for a single-ring design). Check local codes, some areas require permits for any permanent outdoor fireplace structure. Determine the height you want (typically 16–20 inches of usable height inside, so the brick ring sits about 24 inches tall to account for the foundation).
-
Foundation and base: Excavate 4–6 inches and pour a concrete pad (4–6 inches thick) to prevent frost heave in freeze-thaw climates. This is not optional in northern regions: frost will crack and shift unsecured brick. Let the concrete cure for 48 hours.
-
Lay the first course: Set the first layer of brick in a circular pattern using exterior-grade mortar (Type N or Type S, depending on your region’s climate and brick type). Use a trowel to butter each brick and check for level and plumb as you go. Stagger joints between courses.
-
Build the walls: Stack brick courses upward, roughly 5–6 courses high, depending on your target height. Every other course, insert a length of rebar vertically between bricks for reinforcement (especially important if you’re taller than 18 inches). Tooling, smoothing and shaping the mortar joints as they set, gives the structure a finished look and better weather resistance.
-
Install the grate and ring: Set a circular metal grate or fire ring insert into the opening at the top. Some builders line the interior with fire-resistant brick or refractory tiles (designed to withstand repeated heating and cooling). This extends the pit’s lifespan significantly.
-
Cap and seal: Cap the top edge with a decorative brick soldier course (bricks laid at a 45-degree angle) or flat cap stones. Once the mortar cures (3–4 weeks for full strength), apply a water-resistant sealant to protect mortar and brick from weather and staining.
Time and difficulty: Expect 4–8 hours of hands-on work for a simple design, plus cure times. Brickwork isn’t hard, but it requires patience and a steady hand. A second pair of hands makes layout and leveling easier. If you’ve never mortared brick, consider this project a good learning opportunity, the stakes are low if a course isn’t perfect.
Essential Safety Tips and Maintenance
Fire pits demand respect. Uncontained fire spreads fast, and heat damage to surrounding structures can occur even at a distance.
Before you build: Check your local fire code and homeowners insurance policy. Some areas restrict open fires or require permits. Setback distances, typically 10–15 feet from structures, trees, and property lines, are often mandated. Confirm you’re clear before breaking ground. If your yard is small, a propane fire table or small metal ring lets you comply with most codes while still enjoying the gathering vibe.
During use: Never leave a fire unattended. Keep a garden hose, fire extinguisher, or bucket of water nearby. Clear the area of dead leaves, propane cans, and other flammables. Educate kids and guests about staying back from the pit edge. Wear closed-toe shoes, not flip-flops, around an active fire. Use long-handled tongs or a poker, not your hands, to tend logs or adjust burning wood.
PPE and gear: Wear safety glasses if you’re chopping firewood or mixing mortar for a brick pit. Heavy-duty work gloves protect against splinters and rough stone. A dust mask is essential when cutting brick or stone with a circular saw or angle grinder: silica dust causes serious lung damage over time, so don’t skip this.
Maintenance: Remove ash regularly, it retains moisture and promotes rust on metal and mortar degradation on brick. Store firewood under cover and let it dry for at least six months before burning (green wood creates creosote buildup). Inspect metal rings and grates annually for corrosion. If rust is surface-level, wire-brush and re-oil. Deep pitting or holes mean replacement. For brick pits, repoint mortar if joints crack or wash out, and reseal every 2–3 years in wet climates.
End-of-season shutdown: Let coals cool completely before covering or storing a portable pit. Don’t use a lid or cover while the fire is still hot, it traps hot coals and can reignite if you leave it overnight. For propane tables, shut off the main valve and disconnect the propane tank if you’re storing for winter.